Wednesday, March 11, 2015

Dancing Rainbow Sticks

 Spring is in the air! This season cunjours up thoughts of budding flowers, April showers and rainbows. To get our muscles moving and develop our creativity, we made some dancing rainbow sticks and took them to the park to explore. The dancing rainbow sticks were so easy to make. I hope you enjoy them as much as we did.


Who can play?
Children aged 3 years. As with all activities it depends on your child's age and stage of development.

Safety:
Ensure that the stick you use is not sharp and depending on your child's age and stage of development, alter the length of the stick (shorter for younger children)
Supervision is needed at all times. 

What do you need?
1. A stick
2. Ribbons in various colours
3. Rubber band
4. A wide open space

What did we do?
1. The first thing we had to do was to create our dancing rainbow sticks. This was done by simply attaching several pieces of colored ribbon, with a knot to the top end of a short stick. 
To give extra support, I placed a rubber band around the knot...and there you have it... Your completed  dancing rainbow stick.


2. All that is left to do now is take it to the park and explore. Below are a few ideas of how we played with it;

We attached it to the top of the climbing structure and watched the ribbons blow in the wind. We discussed why it was moving and what direction the wind was blowing.


I would hold the dancing rainbow stick and run with it. Bee loved trying to catch it, reaching high and low.


We would make straight lines, curves and swirls with the ribbons and attempt to write letters in the air.


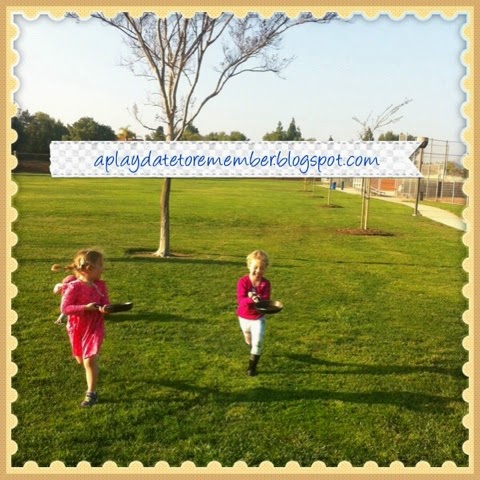
Another favorite was to just run and let the ribbons fly and flap in the wind behind you. I love the sense of freedom in this photo.


The fun did not stop when we started to head for home. The ribbons were removed and placed in Bee's hair, as she wanted to be just like 'Repunzal'


What did we learn?
Physical- Developing large manipulative skills as you make small/large movements in the air and waving the rainbow stick. Fine manipulative skills when attaching the ribbons to the stick.
Art and Design- Creating your own game with the stick and dancing. Colour recognition.
Communication and language- Following directions such as, Can you catch it on the floor or up in the air? 
Literacy- Writing letters in the air with the ribbons. 
Personal, Social and emotional- Fun and enjoyment when playing with the rainbow stick and with you. Developing relationships.
Knowledge and understanding- Learning about weather conditions and elements.
Mathematical-  Counting the ribbons on the rainbow stick. Measuring the ribbons. Shape and space awareness.

Possible Next Steps:
1. Make shapes in the air with the dancing rainbow sticks
2. Why not add music to the play. Experiment with different styles for example, slow music will encourage slow movements and upbeat music will encourage your child to dance faster.
3. Encourage your child to take the ribbons off the stick and reattach. This will develop their fine manipulative skills.


Monday, March 2, 2015

Magic Chinese Writing

We learnt about Chinese writing today, as we continue on our quest to discover and learn about Chinese culture. A great way to introduce this was to read The Pet Dragon by Christoph Niemann. It has some great examples of Chinese symbols and has a lovely story line. It was a big hit with Bee (and me)
Instead of just experimenting writing Chinese symbols with felt tip pens, we decided to make it fun by using a 'magic' crayon and paint.


Who can play?
Children 3 years and above, depending on their age and stage of development.

What do you need?
  • Example of Chinese writing. We chose to look at the writing in the book, The Pet Dragon by Christoph Niemann, however you can download images of Chinese writing from online.
  • Paper
  • Red Paint
  • Paintbrush
  • Candle
  • Newspaper to protect table surface
  • Apron to protect clothes
What did we do?
  1. We snuggled up on the sofa and read My Pet Dragon and discussed how Chinese words look different than English. We talked about how they looked like drawings rather than a group of letters, that make a word. The book was a great example as it actually placed the Chinese symbols into the pictures.
  2. Whilst looking at the Chinese symbols we tried to replicate them on a piece of paper with a candle. We talked about the shapes of the symbols and tried to read the English word underneath. At first Bee did not think that this would work as she said "I can't really see my writing"
  3. Once we had finished making our marks on the paper, it was time to unleash the magic. Taking the paint brush, that she had dipped in the red paint, Bee made horizontal sweeps over the marks she had made with the candle. She looked so surprised with the results. The paint did not adhere to the wax that the candle had left behind on the paper...revealing her magic writing!!! 
  4. Bee continued to cover the paper with the red paint, until all her symbols were revealed.
Possible Learning Outcomes:
Literacy- Writing for a reason. Mark making. Learning about the different forms of writing in other countries.
Communication and Language- Reading stories together and recognizing familiar words. Talking about what they are writing. Answering questions about the book.
Physical- Fine manipulative skills when writing and painting. Hand eye coordination. 
Mathematical- Looking at the different shapes of the Chinese symbols. Spacial awareness.
Personal, Social and Emotional- Fun and enjoyment. Pride from finished product. Enjoying being with someone special and having quality time when reading the book together.
Knowledge and Understanding- Learning about the Chinese culture and how they use a different form of writing for communication.
Art and Design- Creating their own masterpiece. Using tools for a purpose and experimenting with different media, such as paints and wax.

Possible next steps;

  • Depending on your child's age and stage of development you could try to write a sentence using the Chinese symbols
  • Practice writing skills and write a letter for a friend with the candle. Add a note asking the friend to paint the paper (using watery paint) to reveal the message.
  • Look at other written languages such as Arabic and Egyptian hieroglyphics and compare the differences. 

Saturday, February 28, 2015

Chinese Dancing Dragons

When I think of Chinese New Year, it always conjurers up thoughts of Dragons dancing to a beating drum. To promote diversity and cultural awareness we thought we would make some dancing dragons of our own. They were so simple to make and we had lots of fun making them dance to Chinese music.


Who can play?
Children 2 years and above. All activities depend on your child's age and stage of development.

Safety:
Supervision is needed at all times when children are using scissors. For younger children I would recommend that you cut out the head and tail of the dragon and they can color them in.

What do you need?

  • Card (we chose to use yellow and red card)
  • Scissors
  • Felt tip pens
  • Tape
  • Lollipop sticks (I used wooden drink stirrers from our local coffee shop)
  • Gift ribbon 
  • Sweet wrappers/colored cellophane paper
What did we do?
  1. The first thing we did was look at Chinese New Year celebrations online. We watched how the people who were dressed up as a dragon moved, danced and discussed what the Dragon looked like.
  2. We then went on to draw the dragons head and tail on a piece of yellow card.
  3. Using the scissors we cut out the head, tail and a forked tongue.
  4. Taking a piece of red paper, we cut it length ways in half and then made folds one way and then the other, making a concertina effect.
  5. We then attached the Dragons head on one end of the strip of red card and the tail to the other.
  6. Taking the forked tongue, we taped it to the Dragons mouth and placed a piece of orange colored cellophane paper behind it (to represent fire)
  7. To help the Dragon dance, we placed a lollipop stick at the bottom of the head and the tail. We were able to hold the lollipop sticks to make him move.
  8. For extra decoration we placed gift ribbon on the body of the Dragon.
  9. All that was left to do was make our Dragons dance. We chose to play some Chinese music from YouTube and made our dragons dance high and low whilst moving around the house. Bee thought this was great fun and great exercise.
Possible learning outcomes:
Art and Design- Designing your own Dragon. Making up dance moves to the Chinese music.
Mathematical- Using mathematical terms such as high, low, forwards and backwards when dancing with the Dragons.
Personal, Social and Emotional- Fun and enjoyment. Pride from finished product.
Knowledge of the World- Learning about different festivals, cultures and countries in the world.
Physical- Fine manipulative skills when folding the card to make the Dragons body. Developing scissor skills. Large manipulative skills when dancing with the dragons (upper body and leg muscles) Hand eye coordination.
Communication and Language- Listening to and following instructions. This activity will also promote an awareness of different languages that are used around the world.

Follow up activities:

  • Visit the library and check out some Dragon themed fact and fiction books. My daughter Bee loves 'My Pet Dragon' by ?????? 
  • Go to a local pet shop to look at the lizards... you may get lucky and see a bearded or kimono dragon.

Wednesday, February 25, 2015

Chinese Lanterns

There are so many ways to celebrate Chinese New Year. One of our favourite ways is to make Chinese Lanterns.
This is a great creative activity that also promotes important physical skills. Your child will develop their fine manipulative skills when folding the paper and promoting scissor skills too. 


Who can play?
Children aged 3 and above. With all activities it depends on their age and stage of development.

Safety:
Supervision is needed at all times, when children are using scissors. Ensure that battery operated lights are used instead of real tea-lights. This will prevent fires and the burning of little fingers.

What do you need?
  • Paper (preferably red)
  • Glue
  • Scissors
  • Gold glitter (or any other glitter you have available)
  • Battery operated tea-light
  • Tape
What do you need to do?

  1. Cut a 1 inch strip from the top of a piece of A4 card/paper. We will use this later for the handle on the lantern.
  2. Fold the paper/card vertically in half and make cuts going from the fold to around one inch from the top of the paper. I made my cuts around one inch apart.
  3. Unfold the paper and decorate with markers, glue and gold glitter.
  4. Once the glue has dried and you are happy with your final product, bring both side together and attach with tape or as mentioned before staple together and place a piece of tape over the staple, so as not to cut little fingers. 
  5. Tape the 1 inch strip you cut out earlier in the activity and attach both sides to the lantern.
  6. All that is left now is to turn on your battery operated candle, place inside and enjoy how the light shines through it. Happy Chinese New Year!
Possible Learning Outcomes:
Art and Design- Creating your own design on the lanterns, using mixed media and tools for a purpose. Color recognition.
Physical- Fine manipulative skills whilst developing scissor skills, hand eye coordination.
Mathematical- Measuring out the 1 inch distances. counting how many cuts you make in the lantern.
Personal, Social and Emotional-  Fun and enjoyment. Pride from finished product. Working on a project as a team. Contributing to the family.
Communication and Language- Following and listening to instructions. Discussing what they are doing.
Knowledge and Understanding- Learning about different countries and their cultures
Literacy- Developing their tripod grip (that is needed for writing) when drawing and attaching tape to their lantern.

Possible next steps:
  • Use the Lanterns as a center piece for your Chinese New Year themed meal/party
  • Hang the Lanterns on a string to decorate your room or garden.
  • Experiment with different ways of making and decorating lanterns.  
  • Try painting your lantern instead of glue and glitter


Thursday, February 19, 2015

Happy Chinese New Year!!!!

Kunghei Fatchoy!"  Happy New Year.


Today is Chinese New Year. The celebrations last until the 5th March (15 days), so there is plenty of time to join in with the festivities.

Chinese New Year is always on the first day of a full moon. There are 12 signs of the zodiac and this year is the year of the Goat. 

When celebrating different festivals, you promote knowledge and understanding of the world, compassion and equality. 

Over the next 15 days Bee and I will share our fun Chinese New Year themed activities.

To get you started here are a few ideas;

1. Visit your local library and check out some Chinese New Year Fact books. This will introduce the festival and explain what it involves. 

2. Attend a Chinese New Year Festival. Most local districts organise one. They are a great insight into the Chinese culture and fun for all the family. Take a look at your local newspaper or online for your closest one. 

3. Show your child Chinese New Year Celebrations and Dragon dancing on Youtube (obviously vet the clip before showing it to your child) 

Here's to a good New Year! 

Tuesday, February 17, 2015

Perfect Pancake Mix

Happy Pancake Day!


Struggling for ideas for dinner? Look no further. Pancakes are a great addition to a meal or teamed with fruit and yoghurt for desert. 

I have so many nice memories of Pancake Day/Shrove Tuesday. As a child growing up I would devour my mums home made pancakes with a bit of sugar and lemon squeezed ontop and I remember the fun of flipping the pancakes, sometimes they would land in the pan and other times on the floor.

The ingredients are probably already in your cupboard and your children will love the hands on experience of making the batter, watching it cook and attempting to flip the pancake onto the other side. Depending on your child's age and stage of development, they could help in the cooking part. Younger children could always help combine ingredients and toss the pancake in a cool pan.

Ingredients to make 10 Pancakes.
2 cups of flour
2 eggs
1.5 cups of milk (you may need to add more depending on the consistsancy of the batter.
Coconut oil for frying
You will also need a small frying pan, whisk, measuring cups, bowl and spoon.

Method:
Make a small well in the centre of the flour and gradually add the eggs and milk until you reach a smooth batter consistency. It needs to be not too thick and not too runny. Add more milk at this point if it's thick.


Coat a small pan in a little coconut oil and pour approximately 2Tbsp batter into the hot oil. Swirl the batter in the pan, to create the pancake shape. Cook until the pancakes begin the lift away from the side and you see small bubbles popping at the surface. 


Once it is golden brown, practice your flipping skills and try to flip the pancake onto the other side and finish cooking.

Serve with a wedge of lemon or fresh fruit... If it manages to get to the plate :-)


Possible Learning Outcomes:
Mathematical- Measuring and counting ingredients that are needed. 
Communication and Language-Listenibg to instructions and following them. Talking about what changes they can see.
Personal, Social and Emotional- Pride from finished product. Helping make food  for their family. Fun and enjoyment. 
Knowledge of the World- Learning about Pancake Day/Shrove Tuesday. Scientific skills such as change of state.
Literacy- Reading the ingredients list.
Physical- Fine and Large manipulative skills will be promoted as children use a spoon to mix the ingredients together. 

.

Flipping Pancake Game

I just love this simple Flipping Pancake Game. Not only will it develop your child's physical skills but possibly their competitive side too :-)


Who can play?
Children aged 2 years and above, however as with all activities it depends on their age and stage of development.

What you need:
Playdough
Rolling pin
Small pan
Open space

How to play:
Make some pancake shapes out of playdough by asking your child to roll a ball and then by using a rolling pin, flatten it out into a circular shape.
Next you have to place your pancake in a small pan. We used our pans from Bee's kitchen play set.


Once you have your pancake and pan, practice tossing it up in the air and catching it back in the pan.

When your child feels ready, have a race with you or a friend to a certain focal point and ask them to flip their pancake whilst running. If they drop their pancake they have to stop and pick it up.
We had so much fun with this game and  had a little bit of cheating along the way.


Potential learning outcomes:
Physical:  Throwing and catching the pancake in the pan. running and hand eye coordination. Fine manipulative skills when rolling the playdough out and making it flat.
Mathematical: Counting how many times you can flip a pancake without dropping it onto the floor. Developing concepts of the shape of a circle.
Communication and Language: Listening to and following instructions. Talking about what is happening.
Literacy: developing those fine manipulative skills that are needed for holding a pencil whilst rolling the dough. Look at books about pancake day.
Art and Design: Using their imagination and creativity when making the pancake and role play.
Social and Emotional: Joining in with a game and cooperating. Following the rules of the game. Fun and enjoyment.
Knowledge of the World: Learning about the festival that is Pancake Day/shrove Tuesday. Being in their local environment.

Possible next steps:
Why not open a pretend pancake cafe to develop role play. Mathematic concepts could be introduced such as counting out the pancakes and using money.