Thursday, January 22, 2015

Straw Shapes

Recently my daughter Bee has been getting confused with differentiating squares and rectangles. I was wondering how I could help her with this and after drinking with a straw an idea came to me. Why not make squares and rectangles with straws! 


This activity not only promoted Bee to think of the structure of the shapes, but developed her physical skills as she tried to fit one straw into the other.

Who can play?
Children aged 3 years plus. All activities depend on the child's age and stage of development. 

What do you need?
1. Straws
2. Area to lay out the straw shapes
3. Ruler

What did we do?

Firstly, we talked about what makes a square (4 sides that are equal) and looked around our home at objects that had a square shape. We then looked at objects that were rectangular and compared the similarities and then differences. We talked about the 4 sides of a square and them being equal. Next we discussed how a rectangle also has 4 sides, however two are long and two are short. 

The next thing was to explore the straws and make our square shapes. We measured the straws with a ruler, to encourage maths skills and check all straws were the sane length. We talked about if the straws were smaller we could still make a square, as long as they were all equal in size. 


Once Bee was confident in making squares. We went onto rectangle shapes. Bee developed her problem solving skills when I asked her how could we make two long sides. After a while she came up with the idea of putting two straws together. This was achieved by pinching the end of one straw and slotting it through the end of another. 


This led to an extension activity of experimenting with the straws to make other shapes. 

What did we learn? 
Physical Development: Fine manipulative skills when picking up straws, placing them on the shape and pinching the end to fit into another. 
Mathematical Development:  Counting straws, measuring and using maths language such as short and long. Developing understanding of shapes. 
Expressive arts and design: Creating and designing shapes. Using tools for a purpose. 
Personal, social and emotional: fun and enjoyment. Pride from finished product. Working together to solve a problem. 
Communication and language: Discussing what they are doing and how they can make the shapes. Describing the shapes. Following instructions. 
Literacy: Developing fine manipulative skills that are needed when learning how to write. 
Creative designing and making
Talking about shapes in their environment.

Next steps:
1. Experiment making other shapes with the straws and how to connect them. You could always attach them together with cello tape. 
2. Talk about adding more straws to make shapes bigger.
3. Create shape sticky pictures with glue and straws. 
4. Go for a shape investigation walk in your local environment or in the home.

Wednesday, December 24, 2014

Following Santa on his sleigh.

It's nearly time for Santa to make his yearly trip. If you want to follow him, I found a fantastic website that allows you to track where he is. The website also teaches your child about different countries, therefor developing their knowledge and understanding of cultures and other countries around the world. It is definately worth a look. Happy Christmas!

http://www.noradsanta.org

Sunday, December 7, 2014

Favorite play dough recipe

During my years working with children, I have tried and tested many home made recipes for playdough. I must admit, I do cheat from time to time and buy it from the store, but nothing beats a fresh, warm and sweet smelling batch of dough. This recipe can keep for up to a month (sometimes longer) if stored in an air tight container or zip locked bag.


Who can play?
Children one year plus will love this multi sensory activity.

What do you need?

1 cup Flour
1/2 cup Salt
2 tbsp Cream of tartar
1 cup Water
1 tbsp oil
Bowl 
spoon
Pan
Chopping board 
Optional Food colouring and essence to enhanance play

You can double up on the ingredients for a bigger batch however, I have found that the dough gets stuck onto the pan during the cooking stage. 

What do you need to do?
1. Add all the dry ingredients to the pan.
2. Slowly pour in the wet ingredients whilst stirring. Stir until the ingredients are blended together.
3. Place on the stove (low light) constantly stir the mixture so that it does not stick to the pan.
4. When the mixture comes together and begins to look like dough, take it off the heat and place on a lightly floured chopping board.
5. Kneed the dough until it is just warn and has the texture of play dough.
6. At this stage you can add herbs, food colouring or any essence that is needed. Be careful when adding essence as too much will make the dough go soggy. 
7. If you find the dough becomes a little bit sticky over time, just add more flour.

What can your child learn?
  • communication and language- talking about what they see, smell and feel. Listening to and following instructions.
  • Physical development- Hand eye development. Small and large physical development when pinching, pulling and stretching the dough.
  • Personal, social and emotional- Fun and enjoyment. Spending quality time with you will encourage self esteem and bonding. Playing with the dough can also have a therapeutic and stress relieving effect.
  • Mathematics- Shape and capacity. Counting out ingredients.
  • Understanding of the world- change of state 
  • Literacy- Reading ingredient list 
  • Expressive arts and design- creating models and designs with the dough and equipment.
Follow up activities:
1. Explore the dough with just your hands or with tools and utensils 
2. To develop scissor skills, encourage your child to cut the playdough
3. Make pretend food for a shop/restaurant 
4. Bake in the oven on a low heat for several hours to create ornimants or play food etc.


Monday, December 1, 2014

Surprise Christmas books

There are so many lovely Christmas ideas circulating social media and the Internet at the moment, that there are not enough days in December to cover them all! One idea that I came across on oopseydaisyblog.com (http://www.oopseydaisyblog.com/2011/11/christmas-book-advent.html) They had the idea of wrapping 24 christmas/holiday themed books up for you and your child to read before bedtime, over the holiday period. I loved the idea and decided to make this a Christmas tradition for my family.

                                    
                            Our Christmas tree with the wrapped up books, waiting to be opened.
Who can play?
Children and adults of all ages. It has been proven that even reading to your baby can increase their ability to talk, read and have a greater understanding of language and literacy.
This is also a lovely activity for a school. Each child could bring in their favorite book that has been wrapped up and the teacher could read a few each day.

What do you need?
1. Wrapping paper
2. Cello tape
3. 24 holiday themed books. I used books that Bee already had and a few that I found at the thrift store. During the month of December we also celebrate Hanukkah, so I have added books that feature this festival too.

What do you need to do?
1. Wrap up your chosen 24 books and place them underneath your Christmas tree on the evening of the 30th November but, don't worry if you start it later... Your child will still love this activity whenever you start it.
2. Each night before bedtime ask your child to chose a book to read together.
3. Unwrap the book and enjoy it. Bee loved the excitement of finding out what the book was and especially the surprise of finding a new book.

What could your child learn?
  • Communication and language- talking about the title and what they think the book will be about encourages understanding of books and develops inquisitiveness. Reading together will encourage the development of speaking and listening skills.
  • Physical development- when taking off the wrapping paper and turning the pages of the book, your child will develop their fine and large manipulative skills.
  • Personal, social and emotional- Fun and enjoyment. Spending quality time with you will encourage self esteem and bonding. The children will also love the excitement of unwrapping the book everynight until Christmas and hopefully develop a love of books.
  • Mathematics- counting how many books are underneath the tree and the numbers on the pages of the book. You could also talk about the sizes of the books and their shapes.
  • Understanding of the world- learning about festivals that are celebrated around the world, such as Christmas and Hanukkah. This encourages diversity and knowledge, compassion and understanding of different cultures.
  • Literacy- pointing to the words as you read and talking about the pictures will develop letter recognition.
  • Expressive arts and design- you could also create your own christmas book together.

What could be done next?
1. This activity could become one of your families holiday traditions.
2. You could do the same activity but on halloween or easter.
3. Write the numerals 1 to 24 on the parcels and either ask your child to count down from 24 to 1 or unwrap the numbered gifts according to the date.

Monday, October 27, 2014

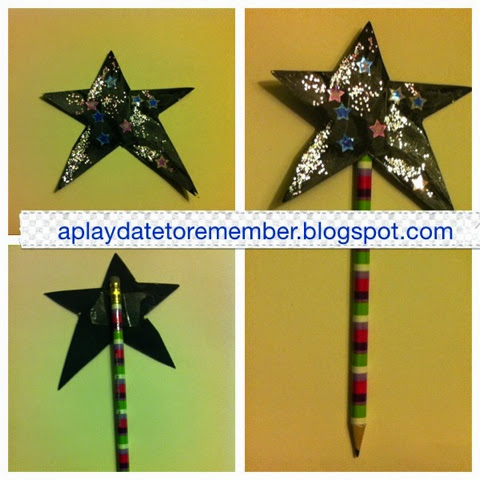
Pencil wand

Needing encouragement for your child to write/mark make? Why not try making this fun wand pencil... Fit for any Witch or Wizard.


Who can play?
I would recommend this activity for children aged 3 years and above.

Safety:
Scissor safety

What do you need?
1. Pencil
2. Scissors
3. Card, preferably black or silver.
4. Glue
5. Glitter and sequins
6. Cello tape
7. Paper 

What do you need to do?
Draw a star shape onto a piece of card. Black and silver make the best colour. Depending on your child's age and stage of development, you can encourage your child to draw and cut it out. For younger children, you can always do this part for them.

Next, apply glue to the star and shake on some glitter and sequins.


Once the star has dried, attach it to the pencil with cello tape or glue. 


It is then ready to use. Children need to write for a purpose, so why not place the pencil on a clipboard with some paper. Leave it next to a cauldron with plastic creatures, to encourage your child to make marks/recognisable letters whilst writing a spell.


My daughter loves using her wand pencil and says it is magic and helps her write... If it encourages her literacy skills then that is food enough for me. 

The wand pencil doesn't have to be just for Halloween, it can be used all year round. 

What can be learnt?


What could be done next?
1. Use the wand pencil to mark make/write recognisable letters whilst writing a magic potion on paper.
2. Draw Halloween creatures with the pencil

Saturday, October 25, 2014

Witches gloopy brew

With Halloween looming, Bee and I decided to make a spooky witches potion. We decided the main ingredient would be Gloop, you may also know it as oblique or silk. If this is the first time you have made gloop, you will be amazed at the end result and it will have you questioning is it a solid or a liquid. 
To add an extra dimension to the gloopy witches potion, we added creepy crawlies, witches fingers and anything else that you may find available from the dollor store/pound shop. 
If your child loves slime and exploring different textures, this activity is for them. Bee played for a solid hour with the gloop. I am not going to lie...this activity is messy, but so worth it!


Who can play?
Children of all ages will love this activity. For younger children, I would recommend removing the small toys and just playing with the gloop.
As with all activities you must take into consideration your child's age and stage of development.

Safety:
Encourage children not to eat the gloop. Even though it is edible substance, I would not recommend eating it. With babies and young children, you could always use their pacifier/dummy if they have one, to discourage them putting the gloop in their mouth.
Constant adult supervision is needed.
Ensure this activity is not carried out on a slippy  floor, as spills are likely.

What do you need?
1. Blanket to protect flooring and for an easy clean up
2. Cornstartch/cornflour
3. Water
4. Food colouring
5. Bowl/cauldron
6. Spoons
7. Cups
8. Halloween items such as witches fingers, bones cut out of card, spiders etc.
9. Witches costume (optional)
10. Brush and shovel for clean up
11.Clipboard, paper and pencil

What did we do?

The first thing you need to do is prepare the area and equipment. I placed a blanket on the floor and brought all the required ingredients outside. We talked about what witches would like to eat and thought of things they would possibly put in their cauldron. Bee's imagination was in overdrive.

Our next job was to make the gloop/oblique/silk. We emptied one box of cornstarch/cornflour into a bowl. Slowly we added a cup of water with your desired food colouring to the mixture. It is important to add small amounts of water at a time, as you need it to be just the right consistency. You will know when it's right. Too little water will make the mixture feel dry and too much will make it runny and you will not be able to pick it up.


Now for the fun part...playing and experimenting with the textures of the gloop. It feels so strange. One minute it feels like a solid and you can pick it up, and the next it is like a liquid, dripping through your fingers. Bee loved making it into a ball and then watching it slowly drip from one hand to the other. It seemed to have a therapeutic and hypnotizing effect.


Once you have finished exploring the gloop on its own, you can add your halloween items to encourage role play and creative development. Bee loved making "Witchy cups of tea" with plastic witch fingers, bones and spiders...mmmm. She counted out the ingredients into the cups developing her mathematical skills and concepts.


When cleaning up the gloop, I find that if you let it dry, it can be easily shook off the blanket and brushed up. This is why I highly recommend you exploring the gloop outside.
Once the activity has finished you can store the dried gloop in a container and if you wish to do the activity again, just add water.

 What did we learn?
  • Communication and language- Talk about what they are doing and what they see and feel. Learn new descriptive words such as sloppy, slippy, solid and liquid. Making rhymes up with the objects and witch songs
  • Physical development- Fine and large manipulative skills when mixing the ingredients together and manipulating the gloop, by pinching, pulling, scraping, mixing and letting it drip . Hand eye coordination. 
  • Personal, social and emotional- Fun and enjoyment. Developing sensory skills. Self help skills afterwards when washing her hands and tidying up. The activity can also have a calming effect on your child as watching the gloop dripping and moving it from one hand to the other can be quite therapeutic.
  • Mathematics- Learning about spacial awareness and capacity. Counting how many fingers and spiders etc they are adding to the witches brew. Counting out ingredients and measuring.
  • Understanding of the world- Change of state and investigating the properties of a solid and liquid. Developing an awareness of the world around them. Problem solving when the gloop gets dry, investigating what you need to do to make it become 'gloopy' again.
  • Literacy- Developing the fine manipulative skills that are needed for holding writing tools. Mark making in the gloop. You could also use the clipboard and pen to write down the ingredients you need to make your witches brew.
  • Expressive arts and design- Designing their own witches brew and role play when pretending to drink it.
What could be done next?
1. Create a Witches tea shop. This will encourage creative play and mathematical too as the children count out money and use addition.
2. Washing the equipment is just as much fun as playing with the gloop. This teaches independence, self help and your child will aldo enjoy playing with the water.
3. If your child is not so keen on the messy gloop, try just making the witches brew with water and spooky objects.


Did it outside to save mess.

Sunday, October 12, 2014

Hand print Autumn trees

I love the Autumn/Fall season. There are so many fun holidays (Harvest festival, Halloween, Thanksgiving etc) but I simply enjoy the changes that the season brings. The weather gets cooler and the colours displayed by the trees are so beautiful. 

After going on an Autumnal walk with my daughter, we were inspired to paint our own tree, using a paint brush and our hands. It was a bit of a messy activity but, so much fun.

Who can play?
Children aged 1 year onwards would enjoy this activity. With younger children the activity is more about the process, where as with older children it will be about the process and the end result.
All activities depend on each individual child's age and stage of development. 

Safety:
To protect clothes, I recommend the use of an apron and newspaper on the floor/table.
Ensure your paint is non toxic and for younger children you could always substitute paint for yoghurt and food colouring.
I always keep wipes and a damp cloth close by, to clean up any paint spills, to prevent slipping.

What you need:
1. Newspaper for the floor/table (wherever you chose to do your painting)
2. Apron
3. Wipes and damp cloth
4. Paper
5. Cello tape to secure the paper to the floor/table
6. Red, brown, orange, yellow and green paint (Autumn colours)  

What we did:
Once we had put on our aprons and protected the floor with newspaper, Bee and I talked about the different coloured leaves that we noticed on our Autumnal walk. We discussed why we thought the leaves changed colour (due to the weather getting cooler and the leaves dying) and briefly touched on the effects that Autumn, Winter, Spring and Summer have on us and our environment.

Our next job was to create our Autumn tree picture. We began by talking about the tree trunks and what they look like. Bee painted a thick brown line and then some twigs coming out of the top. I asked her did her tree have routes and she said yes, and painted two small curved lines at the bottom.


We then set out mixing our paints to make the colour orange and dark red. Using her finger, Bee very carefully made prints with the paint ontop of the tree, to represent leaves. She commented on the colours merging together to make new ones.


Bee really loved putting the red paint on one hand and the yellow on the other. she would then bring both hands together and mix the two colours to make orange. 
We talked  about the texture and properties of the paint when it was on our fingers and hands. This promoted Descriptive language such as slimy, wet and cold and sensory development. 


Once the activity had finished we washed our hands, cleaned the area and paint pots. When the painting has dried I plan to put it in a frame.

What we learn?
  • Communication and language- Talk about what they are doing and what they see and feel. Learn new words such as trunk and photosynthesis.
  • Physical development- Fine and large manipulative skills and coordination when rubbing the paint together on her hands, using the paint brush and her finger to make daub marks to represent leaves. Hand eye coordination. 
  • Personal, social and emotional- Fun and enjoyment. Developing sensory skills. Self help skills afterwards when washing her hands and tidying up.
  • Mathematics- Learning about spacial awareness and patterns. Counting how many fingers they can see on their hand prints.
  • Understanding of the world- Change of state and talking about weather conditions and seasons. Developing an awareness of the world around them and their local environment. Learning about the anatomy of a tree.
  • Literacy- Developing fine manipulative skills that are needed for holding writing tools. Mark making.
  • Expressive arts and design- Learning different painting techniques. Creating patterns and designing. Painting a tree from memory. Exploring paint.

What next?
1. Place the Autumn tree in a frame and during Winter, Spring and Summer make another one.    Discuss the differences and changes that each season brings.
2. Make prints from real leaves. This can be done by painted the back side of a leaf and pressing it down on a piece of paper.